Thursday, September 30, 2010

Happy Anniversary VLV September Week 5

I've had this card finished for a couple of days and just hadn't gotten it posted.  I followed the VLV September Week 5 sketch and the first inspiration photo.


Here's my card.


I used dp by The Paper Studio and then embossed a panel using a Cuttlebug folder.  The image and sentiment are both from Verve's "Love Story."  I added some paper piercing with my Ornare template, a little bling, and a few roses in place of the tabs shown in the sketch. 

Thanks for stopping by and have a blessed day!
Sarah

Sunday, September 26, 2010

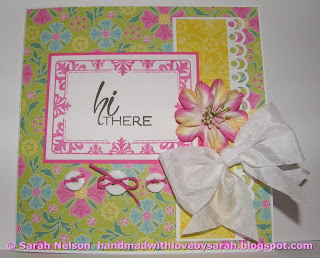
Hi There

This is my card for the week 157 Mojo Monday sketch.  I really liked this sketch.  My only problem was finding a solid block of time to finish this card.  It was literally 5 minutes here and 5 minutes there every day this week!  So it goes.

Here's the sketch and my finished card. 


The frame and sentiment are both from Verve's "Fabulous You".  I used dp by Cosmo Cricket "DeLovely."  They are so fun and bright.  The border punch is by MS, and the big flower is one from my stash.  The ribbon is May Arts silk, tied with a Bow Easy.  The buttons are also from my stash and I added a little embroidery floss to them. 

Thanks for visiting and have a blessed day!
Sarah

Thursday, September 23, 2010

ODBDSLC30


The current Shining the Light challenge at ODBD is to make a white card.   Color(s) can only be introduced by coloring a stamped image and/or embellishments.  My design is pretty simple.  I layered white cardstock to make a 1/16" border and then mounted a panel that I embossed with a CB folder on another 1/16" mat as the background.   The scene comes from the ODBD set "For the Graduate."  I colored the scene using Copics and then cut it out with Nesties along with a mat.

Here's a closeup of the bridge.  The leaves on the trees were sponged in SU! Certainly Celery, and the sky was sponged in SU! Bashful Blue.  I like the soft feel the sponging gives the trees plus I don't have the patience (or time!) to color each leaf individually, at least not today!


Thanks for stopping by and have a blessed day!
Sarah

Tuesday, September 21, 2010

An Unplanned Break and a Bunch of Challenges

I'm finally back today with some cards to share.  We have had computer issue after computer issue and finally decided on replacement rather than repair.  Hubby finished the set up and data transferring last night, so hopefully we are now good to go!  I've missed the deadline for uploading to last week's Mojo Monday gallery on the Mojo website and The Shabby Tea Room's Fresh Living challenge, but I am still able to enter VLV, SNTODBD18, and Cute Card Thursday.


My first card uses the Mojo Monday sketch from last week (number 156), and I combined it with an ODBD sentiment (Psalm 47:2) from the Scripture Collection 3 set.  The dp are from "Summer Song" by Zoe Pearn.  I found that paper stack at Hobby Lobby when they had their 50% off paper sale a couple of weeks ago.  Aren't they fun?  There's a little bit of glitter on the papers, but it doesn't show up very well in the photo.  The "lace" on my card comes from a MS doily lace punch.  I tried a whole bunch of actual lace trims on this card but nothing was working for me, so I went with my favorite punch instead.  The organza ribbon is sparkly, and I tied it using my Bow Easy. I added a little rose on the top to finish it off.  The butterfly is from Michael's, and it is glittery all around the edges.  Love it!

I made this card for the current Stamping in Time challenge at ODBD to use ribbon and lace (or lacey punch), and the butterfly I used qualifies it for the current Cute Card Thursday challenge, Tweet and Flutter.  I had intended to enter my card at The Shabby Tea Room's Fresh Living challenge as well, but that deadline has come and gone.


My second card is for the VLV September Week 4 challenge.  I browsed the House to Home website and found this fabulous vintage living room to use as the inspiration.  I loved the white with the pops of fuchsia flowers and the greenery, so I tried to create that feel in my card.  A white sofa would never work in my home, but I just love the look of this room!


The white embossed panel is one of the SU! Sizzix folders, and the dp is by MME, the "Quite Contrary" collection.  I used a bunch of Prima roses and a MS leaf punch.  The sentiment is from Verve's set Kind Words.  I stamped the medium leafy stamp around the edge and then offset the stamp and stamped again without reinking to create some depth.  The edges of the sentiment panel are sponged with Vintage Photo Distress Ink to give an aged feel.


I've had this big flower for just ages, and it was just right for this card.


I had the card done, and then it seemed so bare in the corners so I decided to add some paper piercing using an Ornare template.  Let me just say that I should have thought of that before I had it all adhered and glued together as it was not an easy task to align the piercing pattern around that big flower and try to keep it straight!  I used sections of the template as intended and then I used a few of the smaller swirls to fill in as needed.  I'm pretty sure that I got my template from ODBD a couple of years ago, but I didn't see that particular template in their current Ornare listings (there were a number of other ones that I would really like to buy though!)


Before I go today, I wanted to post a picture of Ariel.  We were fortunate to take a vacation at Walt Disney World this summer and had a fabulous time.  Ariel had her hair done at the Bibbidi Bobbidi Boutique.  The brown hairpiece matched her natural color so perfectly.   One of our favorite pictures is this one of Ariel and Belle.  She had a ball being a princess for a day.


Ariel and I would also like to say thank you for the comments on her butterfly card.  She was thrilled that you enjoyed her art.  It really made her day, so thank you!  : D

Thanks for stopping by and have a blessed day!
Sarah

Wednesday, September 15, 2010

Psalm 34:4 SC294

I saw the SC 294 on SCS a while ago and just never had a chance to play with it. I loved all of the panels, and it just looked like a really fun sketch to try.


I finally found some time to play with it, and here's my card.


I used a sentiment from ODBD's "Scripture Series 1" and stamped it using Versafine Onyx Black.  The edges of the panel are sponged with Vintage Photo Distress Ink.  The dp are from a My Mind's Eye stack.  I used a MS punch to make the double border, and then finished up with some Prima flowers and an ivory May Arts silk ribbon bow tied with my Bow Easy.

Thanks for stopping by and have a blessed day!
Sarah

Tuesday, September 14, 2010

As You Graduate (with sparkles!) ODBDSLC29

I made this card for the ODBD challenge to use sparkles.  As soon as I saw the challenge, I regretted not purchasing the Poinsettia Bundle during the Labor Day sale at ODBD.  I have more sentiment ODBD stamps than image stamps, and I was starting to panic until I realized that one of the sets I'd ordered, "As You Graduate," had some butterflies that could be glittered.  I just bought a DCWV "Mariposa" stack which has lots of sparkly papers featuring butterflies, so I thought I'd combine a paper featuring a butterfly pattern along with my selected stamp.  I like how the printed butterflies kind of look like they are getting ready to follow the stamped ones down the path.


 I colored the image with Copics and sponged the trees with SU! Certainly Celery and the sky with SU! Bashful Blue.  Then I just added the glitter to the butterflies, matted the image panel, and stamped the sentiment (also from As You Graduate) in the remaining space.

Here's a closeup of the larger butterflies.   I think my Copic coloring and blending skills are improving!  : D


Finally, here's the back of the card using my new personalized stamp from Scrapmagasinet.  The paper pad was 8 x 8, so I had to cut the strip down to fit my 6 x 6 card, but I didn't want to lose the design from either edge, so I cut it a bit off center and covered up the seam with the petite scalloped Nestie circle mat.


Before I go, my daughter wanted me to share her card too.  She was just so cute.  When she saw me photographing my card, she asked if I'd take a picture of her card too.  I asked her where her card was, and she's like, "Hold on Mom, I have to go make it!  I'll be quick!"  So she runs upstairs to where we craft, cuts out a little chunk of paper, folded it, drew and colored her butterfly, and signed it.  Voila!


Thanks for stopping by and have a blessed day!
Sarah


Sunday, September 12, 2010

Anniversary Wishes VLV Week 3

Today I'll share with you the card I made for the VLV September week 3 challenge.  Here is the sketch, the inspiration photo I chose, and my take on it.  As you can see I flipped the sketch.


The papers are from K&Co. Classic K McKenna stack.  I thought these papers came pretty close to the damask in the inspiration photo.  The frame is from Verve's "Fabulous You" set  and the sentiment is from Verve's "Love Story" set.  Both the frame and sentiment are stamped in Versafine Onyx Black.

I added 2 strips of sheer ribbon topped with some ivory satin ribbon to cover the junction and to get a ribbon that was an appropriate scale.  The bow is May Arts ivory silk ribbon tied with a Bow Easy and topped with a button from my stash. 

Thanks for stopping by and have a blessed day!
Sarah

Saturday, September 11, 2010

SNTODBD17 Peace

I finally finished my card for the Stamping in Time challenge at Our Daily Bread Designs.  Let me say first of all, this one was a real challenge for me.  I'd never done the emboss resist challenge before, so first I had to investigate what that was.  I thought, "OK, that doesn't sound too hard."  Then I sat down to do the technique and quickly remembered why I don't do a lot of fancy (or even simple!) techniques.  They give me great difficulties.


Draft one was the lighthouse stamp from Light of the World which I stamped and embossed with clear embossing powder and colored hoping it would have a soft glowing look.  OK, it doesn't.

Draft two was a sentiment from the Scripture Collection 3 set embossed again in clear ink and sponged with pink ink.  Can't read the sentiment.

Draft three was the same sentiment as two just sponged with green ink.  Still can't read it.  Ugh.

Draft four:  How about embossing that new ODBD baroque background?  Hmm, that could work.  Well, maybe not so much as I didn't have detailed embossing powder, so it's hard to see the delicacy of the stamped image.  Moving on....

Draft five was the beginning of some success.  I used the baroque borders frame, embossed it, and when I tried to cut it out with the coordinating die, I had all kinds of paper bits pressed into the embossing since my B plate for my cuttlebug is well-used.

Draft six:  Moving on from five, I thought I'd just do the same thing only use a fresh B plate.  Oops the thing shifted when I went to run it through.  Are you kidding me?!

Draft seven:  OK, I've got the frame stamped, embossed, and correctly cut out.  I go to stamp the sentiment and I DROP the Versafine pad on top of my frame completely ruining it.  I really don't think I'm supposed to make this card today.  sigh.  To make matters worse, as I try to use stamp cleaner to rub the ink off of my omnigrid mat, I KNOCK OVER the open bottle of stamp cleaner.  NO!  Fortunately, it didn't damage much other than some MS border punch strips I had set aside earlier to use later and a few small scraps of paper from this card.

Draft eight:  Frame is stamped, embossed, and cut out.  It is set far out of harm's way.  I open the Versafine ink pad, ink the sentiment (from ODBD "Peace"), and manage to get it stamped on the first attempt.  Whew.

Any of the rest of you ever have that much fun while stamping?! I'm probably just a klutz.


After all of that, the layering was super quick.  I used Basic Grey "Olivia" papers on this card.  Then I just added some satin ribbon and a May Arts silk ribbon with a Prima rose.


For the inside of my card, I used the one paper in the Olivia pack that leaves me going, how in the world do I use this one?  I covered a lot of it as the scallops are uneven, and this way, it looks pretty symmetrical.

Have a blessed day and thanks for stopping!
Sarah

I Used Lots and Lots of Pearls!

About a month ago, I saw this exquisite card by Angie Crockett.  I loved the rhinestone detail Angie used at all of the intersections.  I thought it just gave her card such a finished and elegant look.  I wanted to try a scored background technique, and made this card.  I loved how my card came out, and I got to thinking that I could use the same layout and pearl treatment with some of my Our Daily Bread Designs stamps that {*gasp*} had not yet been inked up.  So I picked out 6 of my favorites and got busy.  The stamps I used come from ODBD Scripture Collection 3, Scripture Collection 4, and Scripture Series 1.

I decided to use pearls instead of rhinestones because of the verses I chose to use.  I left the insides of all 6 cards blank so that they could be used as get well, sympathy, or thinking of you cards. 


All of the cards are 6" square.  They are all pretty much the same, a scored background at half-inch intervals, pearls at the visible intersections, 1/16" mats on the panels, some roses and MS leaf punches with Vintage Photo Distress Ink sponged on the edges.  The sentiments were all cut out using Nesties and embossed in my Cuttlebug and then I just sponged around the edges in SU! Pretty In Pink.  The roses are all from a jar I found at Michael's.  I was so excited to see these new roses added to their flower options.


This card set will likely be going to my mother-in-law for Christmas.  I try to make her a variety of cards, but being in her 70s, she finds that she is using an increasing number of both get well and sympathy cards (unfortunately).  So if you've ever wondered why I make so many sympathy cards, it's so I have a stash for my mother-in-law's Christmas present!  She's hard to buy for, so giving her cards is the perfect option for me.

Thanks for stopping by and have a blessed day!
Sarah
Wednesday, September 8, 2010

Mojo Monday Two Very Different Cards

So with having a day off for Labor Day, I had a chance to sit down and do some stamping!  It was nice to just have that time to relax and unwind. 


I wanted to use the Mojo Monday sketch for this week, so I started with some Basic Grey "Lemonade" papers, a little SU! Mambo Melon ink, added some bling (OK a bunch of bling!), and some sparkly ribbon from Michael's that I tied with my Bow Easy.  The little tag I have had for ages.  I matted it on some black paper and just trimmed it by hand.  The MS border punch covers the part where the top and bottom papers meet.  I did split the striped dp into 3 panels as shown in the sketch, but with the narrow mats I used, it's maybe hard to see that detail. 

The accent circle and the little group of 3 petals are both from Verve's "Thankful Accents" and the 2 sentiments are both from the new Verve set "Birthday Bash."  The circle and mats are all cut out with Nesties (a circle and some big scalloped circles).  I'm also entering this card in The Shabby Tea Room for their weekly challenge of using a tag. 

Here's a close up of the bow.  I wasn't sure how well that glittery organza ribbon would tie, but it was fine.


OK, so then I decided to make a second card using the same sketch.  This one features "Light of the World" by Our Daily Bread Designs.  They have a challenge to use "forgotten" embellishments such as brads and eyelets, so I used an eyelet to attach the tag to the ribbon.


This card is an A2.  I used 2 different K&Co. packages of dp.  The first is a specialty pack by Brenda Walton called Mira, and the second is the Portabello Road specialty paper pack.  I stamped the lighthouse in Tuxedo Black and colored it with Copics.  The tag is sponged with SU! Really Rust.  Just a little black satin ribbon and it was complete.  I also took a closeup of the lighthouse.  I sponged SU! Bashful Blue in the sky very lightly to give it a little more depth.  I'm entering this card in the Flourishes Bring Back Beautiful challenge where the theme is rustic. 


Thanks for stopping by and have a great day!
Sarah

Edited to add:  The lighthouse card was chosen to receive a "Shining the Light Award" on the Our Daily Bread Designs Blog

Sunday, September 5, 2010

Dream Big

All week I wanted to make a card for The Shabby Tea Room's week 25 challenge to use something old and something new.  So I finally sat down Saturday to start my VLV week 2 card based on the following sketch and thought I'd also be able to work it into TSTR's challenge guidelines.  This week, Amber let us pick anything from the At Home section of Anthropologie, and there sure was a lot of great stuff to use as inspiration!  I finally decided to use the rosy knobs as I thought they looked like Primas.  The actual knobs are 2.25 inches according to the description.  I bet they are beautiful in real life!


This card just gave me fits to make.  I struggled with the layout, the embellishments, and the color scheme.  I'll admit that I got up and walked away a couple of times before this one was finished!  I knew I was using the Prima roses, but I just couldn't decide on a color scheme.  Finally, I forced myself to just go with Basic Grey "Capella" as I had some left over strips that I thought I'd be able to use up on the 2 panels.  Then I couldn't decide on which of my new Verve stamps I wanted to use.  I eventually decided to use the frame from Fabulous You and the sentiment from Dream Big.   I used kraft as the center panel just to try something different and to incorporate some of the browns in the dp.


Then I just added my primas and some MS leaf punches along with a recycled corsage pin on which I added a few beads.  The kraft strip was punched with a MS doily lace punch.  That strip was supposed to go on top of the center panel in the sketch, but I just couldn't make it work (sorry for deviating from the sketch!).  I put a little bit of satin ivory ribbon on top to tie it into the big May Arts silk bow on the side.  The button is one I had in my stash that I got from my grandmother's button bin.  I've been waiting for the chance to use this button for a looooong time.  So after all of that, I'm pretty happy with the final result, but wondering if maybe I should have either distressed the edges or done some stitching? 

Thanks for stopping by and have a great evening!
Sarah

Edited to add:  A big thank you to Andrea Ewen for pointing out Amy's photography tutorial on SCS.  I'm so much happier with this picture.

Thursday, September 2, 2010

ODBDSLC27 Be Still

I made this card for the Our Daily Bread Designs challenge to use texture, specifically distressing.  I used the Be Still stamp from the ODBD set "Scripture Collection 3." 


The layout comes from this week's Mojo Monday sketch.


I decided to use the square option.  I used a distressing tool to rough up the edges of my panels.  The center panel is an ivory scalloped square Nestie that was sponged with walnut distress ink.  I used more Nesties for the scalloped circle and plain circle.  I also sponged the edges of the sentiment circle. 


I used some of my new Webster's bloomers (the big brown flower).  I played with some Primas but the white was too stark and the ivory was not the right shade of ivory, so that left me with the bloomers piece.  All of the dp are from Basic Grey "Capella."  The punched strip was made with a MS border punch and sponged with walnut distress ink.

Thanks for visiting and have a great day!
Sarah