Thursday, December 30, 2010

Shabby Baby Sketch

For challenge 42 at The Shabby Tea Room, we are supposed to use this picture as our inspiration and use fabric somewhere in the card/project.


I used this great sketch designed by Claudia Rosa for Friday Sketchers challenge #134 as the basis of my layout.


 Here's my card.


With all of this shabby pink yumminess, where does one start?!  I started with a 6" square white base and added some Vintage Photo Distress Ink to all four sides.  Then I went through my papers and found that the DCWV's "Nana's Nursery Baby Girl" papers were just what I wanted.  The papers relate to the details in the room really well.  I have the pink with white polka dots (patchwork quilt and crib sheet), the pink striped fabric (trash can, patchwork quilt, and dust ruffle), and the teeny-tiny rose floral (patchwork quilt, curtains, plates on the wall, roses on the dresser, and caddy attached to end of crib).  I did some distressing of the paper layers and added zigzagging and straight line stitching to tie in with the quilt.  The rails of the crib are supposed to be represented by the white mats. 


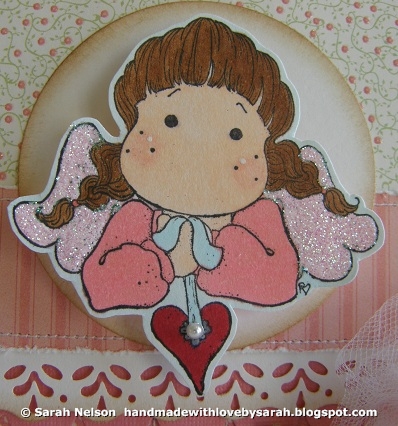
I decided to use this Tilda from Magnolia's latest Christmas collection as the focal image.  I colored her with Copics and added Crystal Stickles glitter to her wings and a pearl to the hanging heart.  The edge of the dust ruffle has lace on it, so I added a MS punched border to the striped paper to mimic the dust ruffle.  I also added some VPDI to the punched border.  I cut out a circle with Nesties, sponged the edges with VPDI, and then placed Tilda on foam tape.  The VPDI is also supposed to help represent the tan hat on the chair.


The biggest challenge for me was how I was going to incorporate the fabric.  I found some white lining fabric that I used to make a rose.  I rolled it up and then rubbed the edge into some SU! Regal Rose ink.  Since the roses in the inspiration picture were pink, I added some mini Recollections pink roses.  Under the fabric flower is some scrunched up white tulle to give it a little more dimension and softness.


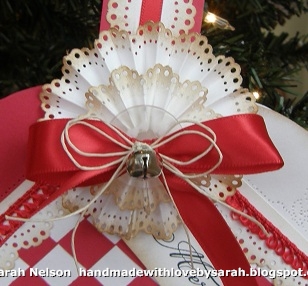
Finally, with all of the pretty pink bows on the crib, I had to add a pink bow to the card.

Thanks for stopping by!
Blessings,
Sarah

Wednesday, December 29, 2010

I'd Pick You

For the last VLV challenge in 2010 we were again to use holliday decor as our inspiration.  I found this ornament on Etsy to use as my inspiration.  It's from OdysseyCreations.  I'm wishing I could buy a whole bunch of these ornaments to hang from my banister for Valentine's Day.  I don't put up a lot of decorations for the various holidays other than Christmas, but I just adore this cluster of sparkly pink frou frou loveliness! 


This week's fabulous sketch was created by Teresa Kline.

Here's my take on the sketch.


I used dp from DCWV's "The Butterflies and Blossoms Stack."  The lightest pink lines are glittered, so this is a really sparkly card!  The sentiment is from Verve's "Dream Big" and stamped in Versafine Onyx Black.  I cut it out using oval Nesties and then hand cut the narrow pink mat.  I put together a sequin border from some loose sequins that I had in my stash.  The white border was made using a MS heart doily border punch. 


The big rose is a Prima.  I got it in a package of 6 called "Love Letter Roses" in rose quartz.  I love all of the glitter on it! 


The smaller roses are from Recollections, and the organza ribbon is from my stash.  I used my Bow Easy to tie it.

Finally, here's a peek at the back of the card.


Thanks for stopping by!
Blessings!
Sarah

Tuesday, December 28, 2010

Ever-Present Help

For week 3 of VLV, Amy Sheffer provided us with this great sketch.

I again went looking for holiday decor inspiration on Etsy, and found this quilted ornament.  It was made by CreationsByAngel.  She had them in lots of different color combos, but my favorite was this burgundy and gold one.  I wish that I had the budget to buy a whole bunch of them!  How gorgeous would a tree be covered in lights and these quilted ball ornaments?!

Here's my card. 

I used a black base, then a brown wide mat, and then a narrow black mat.  The two dp are from The Paper Studio's "Faith" stack.  I used some black satin ribbon and tied it with my Bow Easy.  I used a Verve Plain Jane stamp called "Psalm 46:1."  I stamped the verse using Versafine Onyx Black, cut it out with Nesties, and sponged around the edges mostly in Vintage Photo Distress Ink with just a bit of Walnut Stain DI at the outer border to try and give it a "glowing center" as in the ornament.

Thanks for stopping by!
Blessings!
Sarah

Sunday, December 26, 2010

Most of All

Sankari provided this great sketch for VLV week 2. 

We are supposed to choose our own inspiration pieces from any holiday decor.  For my inspiration, I chose this ornament I found on Etsy made by izzilu


I really liked the colors of the ornament against the green of the tree.  It also resembles a flower! 

Here's my card.  My colors are more muted than those in the inspiration photo, but I'm hoping you can see how it relates to that beautiful ornament.


I used dp from Basic Grey's "Curio" collection.  The sentiment is from Verve's "Bountiful Harvest."  The edges of the sentiment panel are sponged in SU! Old Olive and then I used Vintage Photo Distress Ink over it to give it an aged look.  I used my oval Nesties to cut out the sentiment and mat.


 I used a MS deep border punch and some peach satin ribbon that I have probably had for at least 10 years (felt great to use up that chunk of ribbon!) that I tied with my Bow Easy.  The large rose is from Prima, and I think the little one is from Recollections as are the black pearls (you can see them best in the first picture).


I hope that everyone had a Merry Christmas!  Thanks for stopping by!
Blessings,
Sarah

Friday, December 24, 2010

CCT 144 and SNTODBD24 It Will Be Given

I used the sketch for this week's Cute Card Thursday as the basis of my SNTODBD24 card using scripture as the focal point.

Here's the sketch for week 144 and my card.


I was originally going to use ivory ribbon with a gold edge and the creamy patterned dp in the Basic Grey "Jovial" pad, but I went a complete 180 and used the dark papers from Basic Grey's "Curio" instead.   I hadn't cut into that pad yet, and I've been wanting to use it!  I had to add the bow as that upper left hand corner was just so bare, and I thought my card felt unbalanced without it.


The scripture is from ODBD's "Scripture Collection 4."  I sponged it (heavily!) with mostly Vintage Photo Distress Ink and a little bit of Walnut Stain Distress Ink.  I used Nesties to cut the circle and scalloped frame.

The seam binding is from MS as is the leaf punch.  The big crocheted flower is by Prima.  I really have to start making my own crocheted flowers one of these days as I was a bit sticker shocked when I was in Archiver's (although they were just gorgeous, I must say!).  The little roses are either Prima or Recollections.  I used a MS leaf punch for the smaller leaves and the larger one was in a tin of purchased flowers.

On the inside, I sponged around the edges a bit since I had to trim some of the dp to fit my card.  I used Walnut Stain Distress Ink on the dp panel edges and Vintage Photo Distress Ink on the white piece.


Thanks for stopping by!
Blessings,
Sarah

Merry Mojo 170 Christmas!

I made this card using the week 170 sketch.  I used dp by My Mind's Eye called "Wonderful Winter."  It has glitter on the snowflakes which doesn't show up very well in the picture.  I cut the sentiment out of one of the dp, so there's actually no stamping on this card!

Here's the sketch and my card.


I hope that all of you are able to enjoy some time with friends and family in these coming days.  Thanks for stopping by!
Blessings,
Sarah

Thursday, December 23, 2010

Merry Christmas!

After missing out on linking to TSTR #40 on Sunday night, I wanted to make sure that I met the deadline for this week's TSTR challenge, Scandinavian Christmas.  I was so excited to see this theme as I am of Norwegian ancestry.  Ever wonder about my "odd" SCS user name, embjorg?  It's actually my middle name!  I'm named after my 2 great-grandmothers on my mother's side of the family, Sarah and Embjorg.  Anyhoo, here's the inspiration photo.


For me, this was one of those photos where I knew right away what I wanted to do with it.  I already had the sketch for the WaltzingMouse Sketch Challenge 28 floating in my head and the "We Three ..." guidelines for ODBDSLC42 fit in nicely, too!  We were challenged to use three of the following:  gold, silver, blue, red, snowflakes, ornament, and Our Daily Bread Designs stamps.
From all of that inspiration, I knew I wanted to make a woven heart basket Christmas ornament in red and white with some paper piercing and a silver jingle bell accent.  I went with a sideways interpretation of the WM sketch.

Here it is.


To make the basket, you actually weave the loops of the strips around and through each other.  It gets a little bit tight toward the end, so all of the unevenness is then covered with some white paper punched with the MS doily lace border punch, some red trim I found in the dollar bin at JoAnn's, and some accordion fold flowers I made to hide all of the intersections. 

The handle is red paper with the same MS doily punch on both edges and 1/4" red satin ribbon on top.  I edged all of the white paper with Vintage Photo Distress Ink.  I added a clear button to the top of the smaller flower and then topped it with some hemp and a jingle bell.

The Merry Christmas sentiment is from ODBD's "Christmas Verses" set.  I notched the end to give it more of a tag feeling.  The paper piercing was done using an Ornare template from ODBD.

Here's a closeup of the embellishment cluster.


I also finished the back of the ornament with a smaller medallion and a vintage button from my stash.


Thanks for stopping by!
Blessings,
Sarah

ETA:  I'm so honored that my ornament was chosen to receive a Shining the Light Award.  Thank you ODBD! 

Sunday, December 19, 2010

Noel

Tonight I made a card for three different challenges:  VLV week 1 using a great sketch by Lynda, Beary Scrap's challenge #16 to use pearls or gems, and The Shabby Tea Room's Warm and Snuggly challenge to use fleece or felt.  Unfortunately, I just missed the closing to link at TSTR tonight.  So it goes.

Here's a look at the sketch.  I took a few liberties in my interpretation, but I think I kept the overall essence of the sketch.
My card:


I used fleece to make a scalloped border.  I don't have any of the big scalloped border dies, so I tried to cut one free-hand with scissors using a scrap of pink fleece.  I added the string of pearls to finish the edge a bit.  I added tiny clear gems to the centers of the embossed background after I sponged the edges with SU! Regal Rose to give it a softer feel.

Here's a closeup of the tag.  I used the scalloped tag from Verve's "Glad Tidings" and stamped it in SU! Rose Red.  The sentiment is from the same set but stamped in SU! Purely Pomegranate.  I added a big pink gem to the snowflake's center.  The bow is a bit of seam binding tied with my Bow Easy and topped with some embroidery floss and a jingle bell.  I've seen so many cute projects with little bells lately, so I picked up some yesterday, and I love the finished look!


Thanks for stopping by!
Blessings,
Sarah

Thursday, December 16, 2010

Foxy

I'm popping in quickly tonight to share my take on the Waltzingmouse Sketch Challenge 27.  Here's the sketch.  I rotated it 90 degrees as I thought the bow worked better on the side rather than below Foxy.


On my card, I used dp from DCWV "The Sorbet Stack."  The orange and blue paper has glitter all over it (a little hard to see in the picture) and the glittery organza ribbon I found last year at Michael's.  I used my Bow Easy to tie it.  "Foxy" is from Imaginesce's Twitterpated Collection.  I think she's so cute with the little hearts in her ears.  I colored her with Copcis and sponged around the edges with Vintage Photo Distress Ink.

Thanks for stopping by!
Blessings,
Sarah

Wednesday, December 15, 2010

Joy

I'm back with my card for Mojo Monday week 169.  Here's the sketch. 


Here's my card.


I used dp by Webster's Pages (a combined collection called Waiting for Santa and Sweet Season) along with a little olive green for matting.  I replaced the circle element in the sketch with a flower that I made with a Sizzix Tim Holtz Tattered Florals die.  I am loving this die!  It is so easy to use, and I'm getting faster/better at making the flowers.  I inked some of the edges with Vintage Photo Distress Ink to try and give it a bit more depth and definition of the individual petals.  I used the Imaginesce Petal Roller tool to make the flower.

Here's a closer look at the flower and its little pearl center.


The Joy sentiment comes from Verve's "Glad Tidings" set.  I stamped the medium snowflake in that set using SU! Bashful Blue and then stamped the Joy in SU! Always Artichoke.  A bit of olive satin ribbon from my stash, and this card is done!

Thanks for stopping by!
Blessings,
Sarah

Sunday, December 12, 2010

Christmas Gift Set

I made this Christmas gift set for a couple of challenges.  At ODBD for SLC 41, there were some beautiful holiday trees to use as inspiration.  From those pictures, I immediately knew I wanted to use flowers as my focal point (big surprise, right?!).  Then at TSTR, Challenge 39 is 'Tis the Season, to make a gift item.  I kind of combined several of the pictures.  I chose the decorated box and the colors from the red and white box in the box of peppermint candies.  This also qualifies for ODBD SNT23 to make a Christmas card. 

Here are the inspiration pictures.
 From ODBD:  Flowers!  Lots of red flowers!


From TSTR:  Red and white color scheme, decorated gift box


Here's the project.


I used ODBD's "Christmas Verses" for the Rejoice tag on the box.  I used ODBD's "Luke 2:11" for the Joy to the World panel on the coordinating card.  The card layout is based on a WMSC from August 2010.  I thought the flowers in the sketch were perfect for my project.


I used the Tim Holtz Shabby Flowers die (Sizzix) to make a whole bunch of flowers.  It was easy to make them, just really time consuming.  I used a flower rolling tool made by Imaginesce (I got mine at Archiver's), and it worked like a charm!  All of the flowers and leaves (another Sizzix die) were inked on the edges with Vintage Photo Distress Ink prior to rolling and assembling. 

Here are some closer looks at the card.


I angled the camera a little bit more for the second photo as the sentiment was hiding just a little bit!
I went over the edges of the card, sentiment panel, and lace with Vintage Photo Distress Ink.  I made a 1/2" scored background panel using my Scor-Pal for the background panel.  I used pearls on the edges of the panel and at the score intersections that weren't hidden by leaves or flowers.  There are also pearls in the centers of the flowers. 


The red of the flowers in the closeup is much closer to how it looks in real life.  The other pictures are a little bit dark.

Here's the box by itself.


Then on the box sides, I used a MS border punch for the edges. I used more Vintage Photo ink to sponge the punched border. I added some lace from my stash and some pearl trim to finish the edges.


I made a really big flower with lots of layers for the box cover.  I used the Tim Holtz die again along with another Sizzix die for a rolled rose flower which I used as the center.  I added a few Recollection red roses from Michael's to finish it off. 


Thanks for stopping by!
Blessings,
Sarah