Monday, August 30, 2010

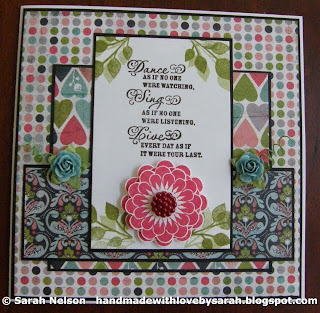
Dance, Sing, and Live

This card was made for the VLV September week 1 sketch challenge.  It took me a while to figure out how I wanted to approach this card.   Here is the sketch and the inspiration room I chose.


 Now, when you see my card, you may be wondering how it relates back to the inspiration room.  I was attracted to the colored polka dots in the rug and the colors in the love wall hanging (pink, turquoise, green, and black).  The heart paper relates to the hands shaped to form a heart in the picture collage on the right side of the inspiration photo.  The third dp is a little more of a stretch, but I thought the colors in it related well to the scheme I'd chosen. 


I used Basic Grey "Olivia" papers for the various panels and matted all of them.  All of the stamps I used are from Verve.  The text is from "Beautiful You" and the flower and leaves are from the new set "Dream Big."  I stamped the medium flower in the set in SU! Real Red and cut it out.  Then I stamped the smallest flower twice, and cut them out and layered them.  I slightly off set the second one so that it would give the flower the look of more layers.  They are raised on dimensionals.  I stamped the leaves in SU! Old Olive and stamped a second time without reinking (slightly off set) to give more dimension.  I used a button from my stash for the flower's center.  I took a close up so you could see it more clearly. 


I cut off the shank of the button and just glued it in place.  Then I just added 2 little roses and called it done!

Thanks for stopping by!  Have a great day!
Sarah

Edited to add:  I forgot to mention that this card also qualified in the Verve project parade to use something old and something new. 

Wednesday, August 25, 2010

Amazing Grace

I wanted to play along in the current Our Daily Bread Designs challenge (ODBDSLC26) to use punches or dies.  After much deliberation, I finally decided to use ODBD "Amazing Grace Hymn" as the featured sentiment. 


I had to photograph this in the evening, and without a light tent, I apologize that the colors are a little off in the photo.  I used Basic Grey "Porcelain" paper for the background.  I stamped the panel and hand cut both of the Nestabilities panels (does that still count as using a die?).  This card is 6" square, and to get the entire hymn included, I would have needed to use the largest die and there was a lot of white border space and it barely fit on the card front (without a mat underneath).  So then I thought I'd trace the outer edge of the second largest Nestie and hand cut the sentiment panel.  I lightly sponged the edges of the sentiment panel with SU! Certainly Celery.  I mounted the panel on the olive mat and just hand trimmed a mat border that's approximately 1/8".  There's a little MS punched border behind the panel and then I just added some roses to the bottom.  There are MS leaf punches behind the biggest roses.  I tried to fit in a silk ribbon bow in the center, but it was just too much and overwhelming.  (At least I have a white silk bow tied and ready to go at a moment's notice!)

Here is a detail shot of the roses. 


Thanks for stopping by and have a great day!
Sarah

Edited to add:  This card was chosen to receive a "Shining the Light" badge.  It made my day!

Tuesday, August 24, 2010

A Warm Hello

Today I made a card based on this week's Mojo Monday sketch.


The flowers are from the new Verve set "Dream Big" and stamped with SU! Melon Mambo. The leaves were stamped in SU! Wild Wasabi.  I stamped the leaves and then stamped them again slightly offset without reinking in between stamping to produce the lighter leaf image.  The flower centers (from Verve's "Budding Blossoms") were stamped, colored with Copics, cut out, and mounted on dimensionals.  The sentiment is from the new Verve set "Happy Hello."  The dp is by My Mind's Eye.  I added some black satin ribbon, a little button with some floss, and pearls to complete the sketch.  The finished card is 6" square.

Thanks for stopping by and have a great day!
Sarah

Monday, August 23, 2010

Wanted!

I was going to post this card earlier today, but I decided to play with the background of my blog instead.  I'm pretty happy with how it turned out, but it took me a looooong time to accomplish what many of you would have been able to do in just mere seconds.  I'm learning though!

I made a card for Jen's Sketch for You to Try (SFYTT #43) from this past Saturday.  It was the perfect layout to use up some last bits of the SU! paper that coordinated with the Wanted and Bronc Buster sets. 

I used the sketch as it was, no flipping or rotating for me this time.

Here is my card, an A2 this time.


I used the SU! Weathered background stamp and then just cut my scraps to fit the dimensions.  I used a distressing tool on the edges of all of the papers and mats to make it look more rugged and masculine.  The edges of the wanted panel are sponged with Vintage Photo distress ink.  I added some gold star brads to the top for the 3 dots in the sketch and tied a bit of twine to make an embellishment where the heart was shown in the sketch. 

I left the inside blank so it could be just a masculine card in my stash (wanted - for you to get well; wanted - to wish you a happy birthday, wanted - for you to be home safely soon, etc.).

Thanks for stopping by!  Enjoy your evening!
Sarah

Sunday, August 22, 2010

"The Delicate Cottage Rose"

I discovered a new (to me) challenge at a blog called The Shabby Tea Room this weekend.  Just take a look at this gorgeous inspiration room!  Wow!  If anyone hadn't already noticed from my use of flowers on nearly every card I make, I have a passion for flowers.  My favorites are pink roses and stargazer lilies. 


So I set out to try to make a shabby chic card worthy of this inspiration room.  At first I thought I'd use a dp background that would imitate the wallpaper in the picture, but then I remembered that I wanted to try a scored background card sometime.  There have been lots of beautiful cards that I've seen that use this really easy technique, and if anyone is not familiar, there is a great tutorial with lots of pictures on how to execute this technique at the Our Daily Bread Designs blog. 

So, here's my card for the challenge.


I scored my center panel at 1/2" intervals.  The center panel is 5" square and the finished card is 6" square.  I added various mats that are 1/16" in width to provide some depth.  I decided to use pearls rather than rhinestones as I wanted the card to be more serene.  I took the strips of pearls I found at Michael's, cut them apart so I had individual pieces rather than a long strip, and placed the smallest pearls on all of the scoring mark intersections using tweezers.  I placed the flowers first and then added the pearls, so the pearls are not all the way under the flowers.  I used medium sized pearls for the sides.  I think it helps to frame the panel.

The sentiment is part of the new Verve release, a Plain Jane called "Psalm 46:1."  I really like this verse as it is so versatile and could be used for get well, thinking of you, or sympathy cards.  The font is also very pleasing to the eye.  I stamped the image in Versafine Onyx Black.  I recently discovered this ink and love it for sentiments.  It gives a crisp outline even for finely detailed stamps.  Then I used Nestabilites to cut out the 2 panels and embossed them.  On the inner panel, while the die was still around my panel, I sponged the edges with SU! Pretty in Pink.  The inner panel is directly adhered to the larger one.  I mounted the larger panel on foam tape.

Then the final touches were of course some roses!  I just found some new flowers at Michael's on Friday.  They had tins of these gorgeous large pink and white roses that are a new item.  The leaves are punched with my MS leaf punch and inked with Vintage Photo distress ink.  I used to just leave my leaves uninked, but I have found that the addition of the brown ink really lends a more realistic appearance to the leaves.  The biggest leaf came in the package with the new roses, and it already had the brown edges.

Finally, I'd like to say thank you to everyone who has stopped by my blog over my first two weeks of blogging and left such kind comments.  Also, a huge thank you to those of you who have signed up to be followers!  I hope you'll continue to enjoy my creations.

Have a blessed Sunday!  Thanks for visiting!
Sarah

Saturday, August 21, 2010

Stamping in Time with a Bird

I made this card for the Our Daily Bread Designs Stamping in Time Challenge.  The challenge was to use a bird image on the card.  I only have a few ODBD stamps (so far!), and unfortunately, I don't have any of their beautiful bird sets.  The rules allowed us to use a non-ODBD bird if needed, so I used the bird from the Stampin' Up! set "Carte Postale" along with a sentiment from ODBD "With Heartfelt Sympathy." 


I followed the sketch for this week's Cute Card Thursday challenge, but I turned the sketch on its side.  The dark papers are from K & Co. and the pink strip is from the DCVW "Luxury Stack."   I added Primas and MS punched leaves that were heavily inked with Vintage Photo distress ink.  The final touches were pearls and burgundy 1.25" May Arts silk ribbon that was tied with a Bow Easy.

Thanks for stopping by and have a great day!
Sarah

Friday, August 20, 2010

Beautiful You

Today is VLV day week 4 for August.  Here's the sketch we had to play with and the inspiration photo I chose.  This week Amber chose inspiration photos from The Pottery Barn.


I found some older K & Co. dp that was a great match to the bedding shown in the photo.  Based on the sketch, I knew I wouldn't have a really large space for an image, so I decided to stamp Beautiful You from the Verve set "Beautiful You" and then fill the rest of the space with embellishments.


I thought I'd try to do a more shabby chic approach on this card.  The finished card is 6" square.  I distressed the edges of all of the dp and the matting papers and also did some zig zagging with my sewing machine.  I opted for a wider zig zag on the red paisley base panel and a narrower zig zag for the middle and top layers.  I strayed from the sketch a bit with the 3 dots.  I laid out different kinds of flowers and I really wanted a ribbon, so I was just about to adhere the 2 flowers and ribbon and it still just didn't look quite right.  I thought what it needed was either some lace or a punched border edge, so I added a strip made with a MS punch and used Vintage Photo distress ink on the edges.  Then I added the 2 Prima cameo roses and the 1.25" white May Arts silk ribbon tied with a Bow Easy. 

I really like this white ribbon.  It's not a stark white, and I've found I can use it with both white paper as well as a light ivory paper as I did on this card.  For reference, the mats behind the dp are the light ivory paper and the MS punched strip was done on white paper.  I didn't ink the center of that strip, so I think you can see how nicely it works with both of those colors.  I'd ordered some of the ivory May Arts silk ribbon as well, but that particular ivory is (to me) a darker ivory, what I'd call champagne.  I auditioned an ivory silk ribbon on this card, but that bow will just have to wait for another day to be used as I thought it was just too dark for this card.

I had a bit of a panic situation while making this card this morning.  I went to grab the ribbon out of my ribbon drawer, and it was gone.  I'd just picked up my work space pretty well yesterday, so I couldn't figure out how I'd managed to not put my favorite ribbon back in its proper place.  I hunted and hunted through my other ribbons.  I finally took all of the ribbons out and sorted them - no white silk.  Ugh.  I'd just ordered 10 yards of this ribbon and haven't used very much of it yet.  Finally, an hour later, I realized that I had put it out on the guest bed (adjacent to my craft space) with the scraps of BG "Capella" papers that I'd been using earlier in the week so that all of those supplies would be together and ready to go for a future project.  Whew!  Well, I guess the good part of all of this is that my ribbon drawer is now neatly organized with ribbons wrapped up on the spools again.  That is definitely a job I would not have tackled anytime soon had it not been for my "missing" silk ribbon. 

If you have never participated in the VLV challenges over on SCS, I highly recommend trying them.  If you complete all of the monthly challenges, you'll be entered to win a prize the following month.  I was the lucky winner for July 2010 in the random drawing, and my prize is the entire new release of Verve stamps coming out tonight!  I can't wait for them to arrive after seeing all of the great sneak peaks by the Verve Divas this last week.

Enjoy your day and thanks for stopping by!
Sarah

Wednesday, August 18, 2010

ODBDSLC25 Stamp it and stamp it again

I made another card using this week's Mojo Monday sketch, and this time I flipped the sketch upside down.
The challenge was to use Our Daily Bread Designs stamps and to use a stamp or portion of a stamp more than once on the card. 


I used Basic Grey "Capella" papers.  The stamps are from ODBD "With Heartfelt Sympathy."  I used the cattails twice and stamped part of the image on each side of the oval, slightly turning the stamp on the second edge so that it wouldn't look too matchy-matchy and would hopefully appear more realistic.  The dragonfly was added to fill in a little space at the top of the oval.  I cut the white oval with the largest oval Nestie and then hand cut the olive green mat. 

I used a MS border punch at the bottom and added pearls to the scallops.  The lace with beaded trim is from my stash.  I also added pearls to the swirls of some of the letters in the sentiment.

The image is colored with Prismacolors using the Gamsol magic technique.  I added soft blue shading to the scene which is kind of hard to see.  Then of course a few flowers and punched leaves to finish it off along with some white silk ribbon tied with my Bow Easy.  The bow looks a bit lopsided in the picture - think it is just the angle of the photo!

Finally, I want to show you how I finished the back of the card.  The two floral strips (top and bottom) are 1/4".  The center strip is 1/2".  It made me happy to use up these tiny little bits! 


Do any of the rest of you save little pieces like I do?!  I end up with lots of 1/4" and 1/2" scraps from trimming sheets to make 6" square cards.  Some pieces I immediately throw away, but others like the ones on this card back will remind me of ribbon, and I'll think that maybe I'll be able to use them as a faux ribbon on a sketch sometime. 

Have a great day and thanks for visiting!
Sarah

Edited to add:  This card was chosen to recieve a "Shining the Light" badge.  I am so excited!

Tuesday, August 17, 2010

Flowers for You

I just love turtles and this little turtle by Whipper Snapper Designs is just so cute!  The turtle is colored with Copic markers.
Body:  YG05
Shell:  G14, Y35, YG67
Toes:  E53
Cheek:  R83
Flowers:  R85
Outline:  B0000

The card is a standard A2 size.  I had just a few more bits of some Imaginesce paper left and I couldn't bring myself to throw them away.  I also had the sketch that I used for this card still sitting on my crafting table, and I thought that if I used an A2 size, I'd be able to use the striped and polka dot scraps and be done with them.  The punched edge was done with a SU! border stamp and then I sponged the edges with SU! Pretty in Pink.  The pink ribbon is also by Imaginesce. 

The bottom flower is another one of the flowers that I attempted to dye to cover the writing.  I thought that SU! Pink Passion ink would cover the writing, but as you can see, it is still quite visible.  

I used the larger flower and layered two other plain flowers on it to cover up the writing.  The center is a button from my stash.  I cut the shank off the button and adhered it to the paper flowers with a dimensional.  The leaves were made with a MS punch and inked on the edges with Vintage Photo distress ink.  The upper left hand corner was a little bare, so I punched a swirl with an EK Success punch.

Thanks for stopping by!  Have a great day!
Sarah


Monday, August 16, 2010

Lovely As A Tree

I made a card using today's Mojo Monday sketch.  At first I thought I'd rotate it so that the scalloped border was at the bottom, but then I decided to turn it sideways.  I'm also going to enter this card in the current Cute Cards Thursday challenge which was to use trees and/or leaves.


I used the SU! set "Lovely as a Tree" for my image.  I stamped the trees in Basic Brown and then added some sponging with Bashful Blue and Mellow Moss.  The image was cut out using Nesties.  I traced the outer edge of the largest oval Nestie to make the mat for the image and then cut it out by hand.  I'm so anxious to get some of those new Mega Nesties as I think they are going to be just what I have been hoping for - larger sizes that will be better for larger stamped images (my trees didn't quite all fit into the largest of the large oval Nesties) and the 6" square cards that I so love to make!     

For the dp, I used Basic Gray's "Capella."  I hadn't cut into this paper pad yet, and the soft colors are very soothing.  I added a little more ink to the edges of the leafy print paper (Distress ink - Frayed Burlap).  I matted all of the pieces on chocolate chip SU! cardstock.  The scallop edge and the lattice edge were punched with MS border punches.  The lattice edge punch has Vintage Photo distress ink added to it.

The bow is 1.25" ivory silk ribbon that was tied with my Bow Easy.  I added a small brown button and used embroidery floss to tie a bow on top of it.  I thought I was done at this point, and then looked back at the sketch and saw the flower, so I just added an ivory Prima rose and a MS leaf with Vintage Photo distress ink sponged on the edges.

I'm down to the last full week of summer vacation. Our first day of inservice is August 26th, and I still have a lot of things on my summer to do list that haven't gotten done.  Usually at this point of the summer, I'm starting to get excited about the upcoming school year.  This year, I'm still waiting for that excitement to kick in for me!   I think that all of the time I spent this summer on finishing my second master's degree has led to me feeling that way.  Once the school year starts and I'm not taking classes, doing research, and writing papers, I think that I will appreciate that I devoted time this summer to finishing my degree rather than putting it off and finishing in December.  If the teaching assignments have not changed, I'll have four sections of ninth grade Biology, one section of Honors Biology (also ninth graders), and one section of AP Biology (juniors and seniors).  

I'd better quit rambling on and on and get to the store for some groceries.  That is the one job that absolutely has to be done today!  I don't mind grocery shopping unless there are long checkout lines.  At that point, it becomes increasingly difficult to keep Ariel from becoming too impatient.

Thanks for stopping by and have a great day!
Sarah

Sunday, August 15, 2010

AVS Sketches

I have 5 cards to share with you today!  I just finished the 5 sketch challenges for Verve's third anniversary.  Last year was the first time that I participated in the AVS challenge, and what can I say, I'm hooked.  The sketches were challenging but fun to complete.  Here's a photo of my 5 finished cards, and then I'll go through the details on each of them. 


The first sketch was a little tricky for me.  I made one card that was 6" square (my favorite size to make) and it just did not work at all with the sketch - at least not for me!  So I came back to the sketch later in the day on Friday, decided to go with pink, black, and white, and I finally was able to create a card that I liked.  I made this first card 4" x 6". 


I used an EK Success border punch for the edges and I just assembled the various other layers.  The white rectangle is embossed with a flower image.  I used circle Nesties to cut out the sentiment from Verve's set Just for You.  The dp is by Cloud9Design.  I added a sparkly ribbon that I gathered along with a few flowers as finishing touches. 


I also used dry embossing on the black panel of my second card.  It just seemed so plain otherwise.  I added more flowers including 2 of the flowers I dyed to hide the writing (they are the bottom 2 petals of the big flower), a few small roses, and a very old blingy button from my stash.  There's also a little sheer pink ribbon hiding under all of the flowers.  The leaves were done using a MS leaf punch and lightly inked with Vintage Photo Distress ink on the edges.  The sentiment is from Verve's Forever in Our Hearts.  The dp is the same Cloud9Design paper used on the first card.  This card is an A2.


As soon as I looked at the sketches, I knew that the third one would be the most challenging for me.  It just looks really complicated to me.  I don't have a huge scallop punch either, so at first I was thinking about cutting circles in half to make that border.  Then I thought I'd take it another direction that would be less complicated and that was to use just a portion of one of the MS deep edge border punches. 


As you can see in the finished card, I just used the very outer part of the design.  It was just way too big for my particular project otherwise.  I put pearls on what would have been the flower centers as it was hard to not have some of the holes showing through where the dp met the white border.  The image is from Verve's One Person and the sentiment is from Verve's Fairy Tales.  I cut out the sentiment using circle Nesties.  I colored it with Copics (G14, RV09, and B0000).  The dp is by Cloud9Design and The Paper Studio.  I used pearls for the three dots in the sketch and some black and pink satin ribbons from my stash.  This card is an A2.


For the fourth sketch, I decided that I could use my new Magnolia wedding couple stamp that (gasp!) hadn't been inked up yet!  I used Copics to color the happy couple (E000, E00, E01, C1 to outline the clothes, E33, E35, E37, RV09, Y35, YG03, and B0000).  The border punch is my favorite MS doily lace punch.  The ribbon is a velvet ribbon I found at JoAnn's.  The sentiment is from Verve's Fairy Tales.  I cut out the sentiment and mat with oval Nesties.  I used dp by The Paper Studio.  This card is an A2.


For the final sketch, I used Verve's Fairy Tales again for the sentiment.  I just added some black and pink satin ribbons, a flower, and a black 1.25" silk ribbon bow that I tied using my Bow Easy.  This card is slightly smaller than a standard A2 as the remaining scrap of Cloud9Designs paper I had left was only 3.75" x 5".  So I just cut the white card base down to 4" x 5.25" so that it wouldn't have quite such a large white border.

Whew!  Marathon post, huh?  :)

Thanks for stopping by and have a great day!
Sarah

Friday, August 13, 2010

With Sympathy - VLV August 2010 Week 3

I was able to make my VLV August week 3 card this morning.  Amber had a fabulous green and pink room as one of the inspiration photos for this sketch.  I usually try to draw on the main colors in a photo as the basis of my color scheme, and I'm really happy with my finished project.


First, a look at the sketch and the inspiration room I chose.  The bedding is from dunelm-mill.com


I just bought the My Mind's Eye (MME) designer paper on Wednesday this week at a local shop.  The name of the paper is "Quite Contrary."  I just love the colors pink and green together, and I thought the prints were so beautiful.  So when I saw today's sketch and the inspiration rooms, I knew immediately that I wanted to use my new papers! 

I debated about what I wanted to use on the center panel as I didn't want to cover the MME paper.  I finally settled on "With Sympathy" from Verve's set  "Blessings" as it would fit the smallest of the Fancy Tags Nestabilites die.  I cut and embossed the diecut and then stamped my sentiment so I could get it centered.  I added a small adhesive backed pearl to the end of each side of the tag to dress it up just a little bit.

I punched a border for the white strip that I used to mat the pink dp using a MS doily lace punch.  The final touch was a Moss green 1.25" silk ribbon bow that I tied using my Bow Easy.  I ordered my Bow Easy from Sharon Johnson here and the ribbon as well.  For anyone interested, there is a great tutorial on Jerri's blog here

Thanks for stopping by and have a great day!
Sarah


A Fairy Nice Day

Here's my card for the Mojo Monday Week 151 sketch challenge. 


The image is "Enchanted Lily" by Pink Cat Studio.  I colored the image using Copic markers.
Skin:  E000, E00, E01
Dress:  R81 and R83
Flower and wand:  E33, Y35, R83
Lilypad:  G24
Frog:  G14, 110
Hair:  Y21
Wings:  B000
Outline:  B0000

The dp is by Imaginesce, and the pink scalloped border was done with an SU! border punch.  I used 1.25" May Arts silk ribbon in pink for the bow (tied using a Bow Easy).  If you have not tried this ribbon, it is fabulous!  I ordered mine here from Sharon Johnson. 

Thanks for stopping by and have a great day!
Sarah
Thursday, August 12, 2010

VLV August 2010 Week 2

I finished my card for the VLV week 2 sketch challenge.  I decided that I wanted to use the second inspiration room so that I could use my Basic Grey "Green at Heart" papers.  This card is a standard A2 size.  Most of my cards are 6" square, but when I was laying out my 3 strips for the sketch, it just wasn't working in the larger square size for me.


I knew that I needed a rectangular shaped image/sentiment panel so I turned to the Verve set "Blessings."

The top right corner was a little bare, so I added some flowers to fill up the space and some leaves I punched with a MS punch (Vintage Photo distress ink sponged on edges).

For the inside I used a little strip of the dp leftover from cutting the 6" square paper down to fit an A2 card.  I matted it on some olive green paper and then added a white panel to write a message.


On the back, I took the remaining piece of dp and just added my personalized label stamp to an olive green mat (both were cut with my circle Nesties).  Yay - no dp scraps at all this time!  I hate to throw small pieces away as it just feels wasteful to me, but at the same time, I'm tired of accumulating scraps!  Anyone else have this problem?!  LOL.


Have a great day and thanks for visiting my blog!
Sarah

Wednesday, August 11, 2010

Pippi

Today I have a fall themed card to share.  The image is from CC Designs.  She is called Swiss Pixie Pippi.  I colored her using Prismacolor pencils and blending stumps.  The edges are sponged with SU! Basic Brown.  The dp is by Basic Grey.  I added some big flowers with a gem on each one and a little lace with some small rhinestones.  I added a little glitter to her wings since she is a fairy.  The finished card is 6" square.


The folded brown paper at the bottom was inspired by Amy Sheffer's card that you can see here.

Here's the inside of the card.  I used a little scrap of the dp at the bottom and covered the seam between the white cardstock and the dp with a piece of gold satin ribbon.  The scrolls are punches by EK Success.  I sponged around the edges again with Basic Brown.


Finally, here's a look at the back.  I made this card before I ordered my personalized stamp so I simply used the leaf stamp from Verve's Forever in Our Hearts and the Just for You comes from Verve's Just for You.  I used another scrap strip of paper and just handwrote handmade with love by Sarah.  I used my scroll punch again here, too.


Thanks for stopping by!  Have a great day!
Sarah

Tuesday, August 10, 2010

Another Friday Sketchers sketch

The card I want to share with you today is based on another Friday Sketchers sketch that I'd been meaning to use .... someday!  The sketch  (#93) is from March 12, 2010. 


I changed the center panel shape from the sketch. The one shown in the sketch is one of my favorite Nesties, but I was able to mimic the shape of the flowers in the patterned paper by using the blossom Nesties.  I used a Sizzix embossing folder to give the white circle a bit of texture. 

Tilda was colored using Copic markers and then cut out.
Here are the Copic colors I used:
Skin and cheeks:  E000, E00, E01
Dress:  R81, R83, R85
Hair:  E33, E35, E37, 0
Stars, wand, and crown:  Y35 and Y38
Outlining:  B0000

The blue ribbon with crowns is also from Imaginesce.  I used a MS doily lace punch to make a border strip for the ribbon as it wasn't standing out enough from the patterned paper by itself.  The flowers are attached using dimensionals, and I added MS punched leaves with Vintage Photo distress ink sponged on the edges.


I added a rhinestone crown detail (found at Michael's) to the inside of the card.  I really wanted to use it on the front of the card, but it just did not show up against the background papers.  I had a few pieces of patterned papers from Imaginesce left that I wanted to use up. I've really been in a mindset of using up some of my supplies lately - just too much clutter in my crafting area these days. So between the panels on the front, the decorated inside, and the back I used up a few more bits.


I sponged the edges of the paper lace strips with SU! Pretty in Pink ink so that it would just slightly stand out from the base of the card. 

Thanks for stopping by!  Have a great day!
Sarah